I have always loved to draw and try my level best to explore different ways in which I can improve my drawings by experimenting with different techniques and mediums.
So, this week I was trying to draw scenery and even though I got the composition alright I struggled with one thing the most, Shading.
I’d say I’m at least decent in shading however the scene I was drawing was a bit complicated and I noticed my shading game was just not up to standard.
I started learning about how much there is to shading and there are a lot of things that were new to me.
I thought that if I, as an intermediate artist, struggled with the topic of shading many beginners and even professionals might have the same kind of issues and questions.
So, I compiled everything I learned together and created this helpful guide that will walk you through everything you need to know about shading and how to effectively implement it in your drawings from start to finish.
What are the Different Techniques for Shading?

There are mainly 6 techniques of shading and these are also the most common:
- Hatching
- Cross Hatching
- Blending
- Scribbling
- Contouring
- Stippling
Hatching

Hatching is a sequence of lines drawn in the same direction. It is the most common method of shading.
I recommend for any beginner to start with hatching as it will give you a feel of how shading works and improve control and precision in your lines.
In hatching, lines that are more closely drawn are darker in value and lines that are further away from each other are lighter in value.
Cross Hatching

This is the second most common method as it goes hand in hand with hatching.
In hatching we know that it is a sequence of parallel lines drawn in the same direction. However, cross hatching is when you draw lines over those lines in the opposite direction.
In terms of value, the more closely packed those lines are the darker they will appear, and the more loose they are the lighter they will appear.
Also, a good thing to note here is that, it doesn’t mean cross hatching only consists of two lines crossing each other. You can add multiple lines in different directions crossing over one another to add to the shading and make it darker in value.
Blending

Another very popular shading technique is blending. This is the one most people are familiar with and it is when you use either pressure, your finger or a blending tool to blend lines together to make up smooth gradations.
The values depend on the density of the lines you blend together and how much pressure you apply when making your lines. Beginners usually start off this blending technique relying on pressure and their finger and later progress into using a blending stump or tortillon.
Derwent’s pack of 3 blending stumps is great for blending and giving you that smooth gradient look.
Scribbling

This is as the name suggests, when you shade using scribbles. To vary the value produced, the more the scribbles go over each other the darker they will appear and vice versa.
Contouring

This is also another popular method and is usually used in combination with other shading techniques to give off the desired effect.
In contouring, the lines are curved in order to follow the contours of the subject so, there’s no one direction for your lines to go they can be drawn horizontally, vertically and even diagonally.
Stippling

Stippling involves drawing a collection of dots to build up darker values in your drawing. The value produced depends on the density of the dots.
Do I have to learn every technique of Shading?
This is a question I asked myself when I discovered the many types of shading techniques and how they’re different from each other. You should learn every type of shading technique there is so that you always nail your drawings.
This is because when you study every different technique of shading and how they give out different effects, you can add variety in your drawings. You would often find yourself having to tweak your shading a bit in order to make the drawing more realistic and a consistent way to that is by learning different methods and how/where to apply them which we will further discuss.
Combining different techniques of Shading

Now, when you have finally learned about all the different techniques of shading it’s not uncommon to combine them together to make one piece of artwork.
As you practice these techniques you will start to have a better sense of how to combine the techniques together to get the texture you want.
For example, complicated and detailed artworks sometimes require you to shade in different ways.
How to Choose which technique to use and where
Since the above shading techniques are different from one another and have a distinctive texture, you might wonder which technique is best for which type of drawing and how to apply this knowledge in your artwork.
Hatching can be used to shade any art piece. it is a very versatile technique as it is easier to combine it with other shading techniques the most common being contour hatching.
Contour shading involves shading an object with hatching but the lines are drawn following the curvature of the subject. This allows for a more realistic look altogether and makes hatching that much more effective.
Hatching, as discussed before. is also linked to cross hatching which is used to add density and darken the lines to give the illusion of form and light.
Hatching when used alone can help you achieve realistic textures such as, brushed steel or wood, as hatching basically consists of a series of straight lines.
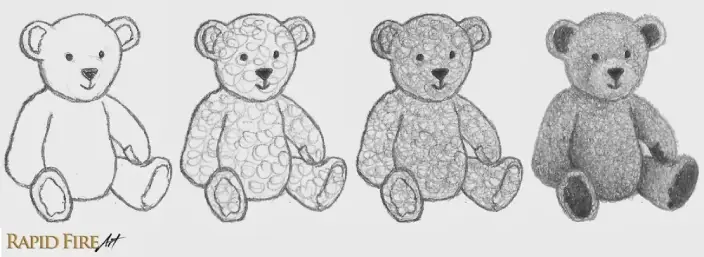
Circulism is usually used to create realistic skin textures, or give off a more “fuzzy” vibe. Circulism can be used to draw cotton, fabrics, fuzzy fabrics (such as children’s teddy bears) etc.
Circulism and scribbling are somewhat alike as scribbling gives you the same effect but with a rougher looking texture.
I’ve found scribbling is best used in drawing rough as it gives off a loose sketchy effect. Think about the rough drawings people make when creating concept arts. they aren’t exactly “finished” and usually involve a lot of scribbling just to give a subtle yet evident illusion of light and form.
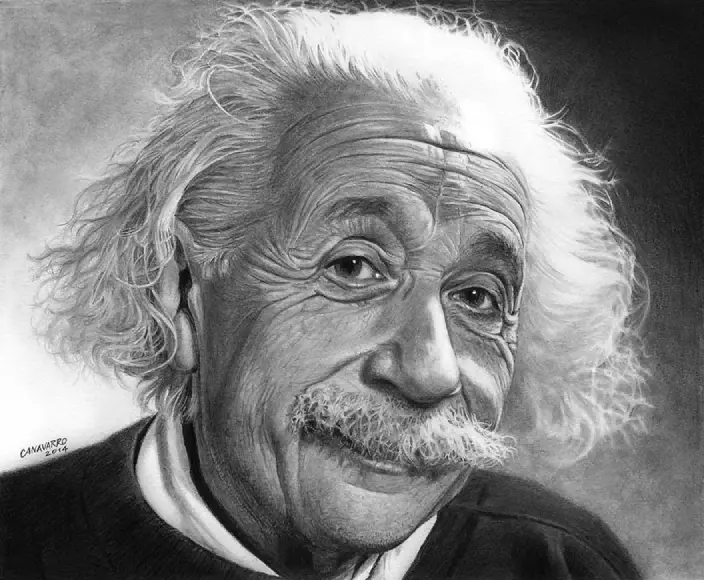
Blending is another common technique used usually in variation with other shading techniques. However, I personally feel that blending alone can give your drawings a realistic look. This technique is usually used in portraits to achieve the illusion of form in a person’s facial features.
Blending can be used when you want to have a smooth yet subtle transition in values and gradation. To achieve the best results with blending however, you might require some professional tools such as a good graphite pencil or charcoal and a blending stump/tortillon.
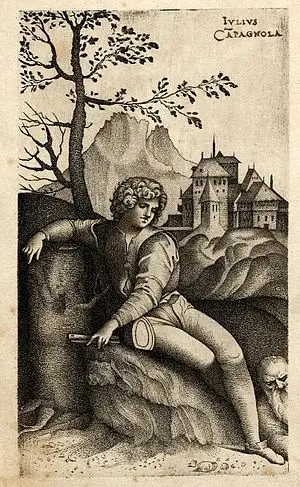
Stippling is a lesser common technique but quite unique. In earlier centuries, artists used to use the stippling technique in order to create sculptures, engravings and paintings.
Giulio Campagnola was known for coming up with this method in 1510 during the renaissance period and mastered it in printmaking. Back then, prints used to be made in black and white so stippling was used to create depth and form.
Stippling is best for artists trying to experiment with their creativity when drawing shapes and shades of simple still-life objects. Some objects also sometimes have textures in which the ideal method for shading might be stippling for example, an orange or a golf ball.
Stippling isn’t often used with other shading techniques as it is far unique than the other shading techniques discussed here and does not offer much versatility in terms of variation.
Elements of Shading

The elements of shading are what you see in a shaded drawing which makes it appear realistic, if any of these 5 elements are missing, your drawings will appear flat.
The reason these elements are essential is because when they come together they create the illusion of depth and form helping the viewer to see how light is reacting and bouncing off the object.
Cast Shadow
The cast shadow is the darkest tone in your drawing as it is opposite to the light source. This area has no light as it blocks light and casts a shadow.
Shadow edge
The shadow edge is the second darkest tone in your drawing. Its name might misdirect you a bit as shadow edge doesn’t mean the edge of the cast shadow but rather it is the part that is opposite of the light source where the object is curving or moving away from the light source.
Half-Tone
The half tone is the in-between of the light source as it is not directly under the light source nor is it totally opposite of it, casting a shadow. The half-tone is a medium gray tone with neither a dark nor a light value.
Reflected light
Reflected light is the edge of the cast shadow which separates the cast shadow from the shadow edge. This is crucial in every drawing as it gives the illusion of depth and is necessary to transform a flat looking object into a more realistic 3d object.
Full light
This is the brightest part of the object as it directly under the light source.
What You Need to Know During Shading
When shading a subject there are a few concepts that you should keep in mind in order to know why certain shading techniques behave differently and how shading actually helps in achieving the desired effects of realism in your drawings and sketches.
Without knowing these terms you might have no idea why a certain image may look flat and why another might look 3d and realistic.
Light

Light is not only essential to shading but light is also how we are able to see things.
If your drawings look flat despite knowing all the shading techniques above, your shading might not be the problem but you might not have a proper understanding of how light works.
Firstly, there is the light source, this is from where the light is directly coming from and hitting the object – however, its not that simple.
A hard light source might be something like a table lamp focused on the object you are drawing which is simpler to interpret. You know exactly where the light is coming from and it casts a consistent shadow which shows you clearly the illusion of form.
But, If you are drawing a more complicated scene from your everyday life it might be harder to know how the light behaves.
For example, if you are making a live drawing of a theater you might see different sources of light coming from different directions. There are shadows casted by phone screens, the main film screen, the lights behind the audience from which the film is being played etc.
It might be difficult to interpret all these light sources into your drawings as you don’t have clear direction so it is best to break down the scenes into parts and discover the hard light sources within them and shade accordingly, or try to move to a setting with a hard light source.
This will be easier for beginners however, if you are a more experienced artist then practicing seeing objects in perspective and studying their behavior might be a more realistic approach.
Obviously, the second approach takes a lot of time and experience and unfortunately there’s no shortcut to help you in that. It is more of a personal journey you have to take and develop your perception on things.
The second thing you have to know of light is how it behaves when it hits certain objects or bounces off it. When an object is exposed to a direct source of light it will almost always have a shadow in the opposite of the light source (known as a cast shadow).
However, that isn’t the end of it as how close the object is to the light also effects the casting of it’s shadow.
For example, if we take the sun as a direct light source we will notice the trees cast a shadow. However, this shadow behaves in accordance with the sun as during noon the shadow might be much smaller but at dawn when the sun is setting it casts a much wider shadow of the tree.
This is because the shadow is always drawn in the opposite direction of the light source. As the sun is on top, the shadow is below the tree but when the sun comes down the shadow moves up and towards east as the sun sets at west.
Value
Value is one of the seven elements of art and is absolutely essential for any kind of artwork as it is responsible for bringing the illusion of light. Values deal with the lightness and darkness of colors – the light colors are called tints and the darker colors are called shades.
Value can be clearly recognized and understood using the value scale below:

Most artists use this scale while drawing their artwork but they don’t constantly refer to it but rather have it in the back of their mind whilst drawing.
For a beginner, it might be beneficial to refer to the scale as it gives you a better sense of value and how you can effectively implement it in your artwork.
Tints – These are the lighter values on the value scale

Shades – These are the darker values on the value scale

Highlights – These are areas in the drawing in which the light is hitting the surface – causing a bright light to reflect off of it.
Shadows – These are the areas that block the light and cast a shadow behind the object, opposite of the light source.
Form
Form refers to three-dimensional objects with a specific length, width, and height. The only purpose you try to achieve with shading is the illusion of form which is to make simple flat objects appear 3d and realistic.
There are two kinds of forms;
Geometric forms – These are forms with specific names and shapes such as a cube, cone, sphere, or cylinder.

Organic forms – These don’t have a specific name and have a unique shape. These are known to be naturally forming shapes – an example might be the human face, it isn’t a circle nor an oval, but it’s a whole shape with bumps (cheekbones), sharp points (jaw) and ridges (brow ridge) etc.

To create the illusion of form we must have a good understanding of the elements of shading which we discussed above and some of the terms we are going to be discussing below.
Space
Space is the emptiness or area between, around, above, below or within objects. Space deals with the surroundings of the subject other than the subject itself.
Even though there are 2 kinds of space – 3d space and 2d space – we will be focusing more on the 2d space as it deals with the illusion of depth and it’s goal is to make a flat object look 3d.
This illusion of depth is created when we establish a number of different techniques such as perspective, contrast, size etc.
What these concepts mean for space is that by viewing things from a certain perspective within an empty space can create the perception of a three-dimensional object, look at the example below:

By adding a line above the cube we create the illusion of space which adds to the three dimensionality of the cube however if we remove the line it just looks like a plain, simple cube.

Ways to shade in your drawings
There are 3 main ways to shade in your drawings;
- Pressure
- Layering
- Grading
Pressure

Pressure refers to the amount of force you put on your pencil while drawing, or in this case, shading.
Pressure is the most obvious way to start shading as you can vary the value of your lines with force. In order to draw darker lines you’ll add more pressure and to draw lighter lines you’ll apply less pressure.
This can also be commonly seen in blending where someone might start with a light grip and shade around the object gradually increasing the pressure with a firmer grip on the pencil close to the point.
The same can be done for another shading technique: hatching. In hatching, to show darker values you might draw darker lines and to show lighter value you may draw lighter lines.
However, there are other ways to shade with a pencil which include layering and the grades of the pencil.
Layering

The second method is to shade using layering which is when you draw multiple line on each other stacking them to create darker values in your drawings.
Grading

Many artists might prefer to use darker pencils (6B, 8B) to fill in shadows then move on to a 2B pencil for a mild tone of shading and then finally use the harder pencils (2H, 4H, 6H) to shade in the lighter values. This is shading using different grades of pencils.
Layering and Grading are far better methods for shading as they offer much more control and consistency. Pressure isn’t very consistent as it might be difficult for you to achieve the same results every time due to your grip changing.
Recommended materials for shading
There are a number of art supplies you can use that help you excel in your art career the below mentioned items will be ones that professionals use to shade their pencil drawings.
The Best Pencils for Drawing and Shading
The first thing every artist or hobbyist needs is a good quality pencil.
Below are some of the best and most consistent pencils I’ve found. If you plan on buying the pencils, the below links would take you to Amazon or Blick depending on what you choose.
I chose these because you could usually find many items for a cheaper price on there with good quality and shipping. Buying art supplies can be a big investment for some people (including myself) so the extra savings go a long way.
1. Palomino Blackwing

The Palomino Blackwing pencils are the greatest pencils of all time. They have a great reputation and a trusted brand.
They have been used by many award-winning artists including, Chuck Jones – creator of Looney Toons, John Steinback, and Shamus Culhane (who was buried with one).
The blackwing pencils come with 3 main options:
- Blackwing – A soft pencil with grading similar to a 5B Pencil
- Blackwing Pearl – The Blackwing pearl has a grading similar to a 4B Pencil
- Blackwing 602 – This is the softest amongst the 3 with a grading similar to a 3B Pencil
The blackwing pencils have a soft Japanese graphite which gives you smooth consistent strokes without excessive sharpening. It is very smooth to draw and sketch with these as the lead has wax added to them.
It features an iconic rectangle eraser which keeps it from rolling and is replaceable with an eraser or pencil extender gicing you more control over your grip.
If you want a pencil you’re going to be using for the rest of your life, this is it.
2. Staedtler Mars Lumograph Graphite Pencils

Staedtler is a well-known and trusted brand. Many professional artists use the Staedtler mars lumograph pencils for their high-quality graphite and consistent strokes.
The Staedtler Mars Lumograph set of pencils range from 6B to 4H and come in a portable metal case.
The pencils are break-resistant, have a high-quality cedar wood casing, and are a great value for money.
3. Faber-Castell 9000 Graphite Sketch Pencil Art Set

Faber-Castell has been around since 1761 and is known for its high-quality art supplies – especially its pencils.
The Faber-Castell 9000 pencil set offers 12 durable, consistent pencils of various grades in a small light-weight metal case.
These pencils are an artist’s favorite – for beginners and professionals.
The great thing about all these pencils is that they come with different grades and are recommended by industrial professionals.
I also wrote an article on the Best Pencils for Drawing and Shading which includes reviews of these pencils and some other great choices.
The Best Blending Tools
To blend your drawing together you can use a finger or a cloth but these tools were designed to do the job in a high quality professional manner;
Pro Art Blending Paper Stumps – You can try getting these on Amazon but they’re usually out of stock. If you’re ordering from the U.S. another good place to find them is on Blick where you can get them pretty cheap
Derwent Paper Stump Blister – These are the most reliable blending stumps due to the credibility of Derwent. Amazon is loaded with Derwent supplies so I’d recommend you buy it from there – unless Blick has a sale on them
Best Sketchbooks for Drawing and Shading
1. Moleskine Art Collection Sketchbook

The Moleskine Art sketchbook is a great sketchbook for artists on the go.
It has a durable hardcover with an elastic closure. Inside are high-quality, thick ivory pages which are perfect for giving you smooth consistent strokes.
It also has a lot of different options.
It comes in 5 sizes (medium, large, A3, A4, Pocket) and 3 different colors (Black, Sapphire blue, and Scarlett red) satisfying every individual.
2. Canson Side Wire Pad XL-Series Drawing

Canson is a well-established brand with high-quality sketchpads for various mediums.
The Canson side wire-pad is great for shading as it has a smooth white surface which gives you that smooth gradient in your shading. Pencil marks also erase nicely preventing smudging in your drawings which might be common while blending.
The Canson sketchbook is huge and great for larger artworks.
3. Strathmore 400 series Toned Pad

The Strathmore Toned Tan sketchpad features a tanned drawing paper which gives your artworks a unique look and feel.
This sketchpad is ideal for pencil and charcoal drawings, sketching, and shading. Acid-free pages also prevent yellowing of paper allowing you to preserve them.
Conclusion
By the end of this article you would have the knowledge of the different shading techniques in drawing as well as how to and where to use them.
What came as a surprise to me was how much shading has to offer from different terms, to illusions to combining different techniques together. Artists use shading in many ways and to create the illusion of form, light and space to make flat objects appear 3d and realistic.
You should also be equipped with some drawing supplies if you are serious of taking your sketching and your shading to the next level. The supplies mentioned above will help you excel in shading by offering you better consistency, precision and control over your designs.
However, even after reading this article you’re not done as you have yet to complete the most important step of shading and that is to practice, so grab your pencils and start working your magic!